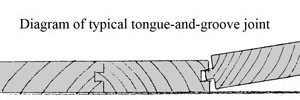
Can You Nail Hardwood on the Groove Side
Prep, layout, installation and finishing tips for tongue and groove floors.
Installing natural language-and-groove floors—engineered, pre-finished or bare forest—is amongst the virtually pop DIY projects, and for skilful reason. You don't need a truck load of tools to do a good job installing them and once you go the hang of information technology, you can work like a pro. And, whether you're a seasoned home improver remodeling every inch of your house or doing a weekend upfit on a single room, the prep, installation and finishing techniques are largely the aforementioned.
On a large project, the first thing to know about installing tongue-and-groove flooring is that installing the boards should exist the last thing you do. I like to install them afterwards all the windows and doors have been set, and the room has been trimmed and painted. That way no painter can spill a five-gallon bucket of latex pigment between the joints (the thought of that simply makes me shiver), and it isn't caked with mud from drywallers, plumbers and electricians spilling and trundling all over the place, which makes the sanding job tougher later. Finally, putting the floors in last means installing the fabric in a known and comparatively consequent level of estrus and humidity. And then later on, when the house somewhen does reach its equilibrium point (i.e. doors and windows aren't open up 10 hours a day and the interior infinite is appropriately conditioned), the floor you lot install won't loving cup or gap.
On a weekend-type projection, the chaos you have to deal with is unlike, simply still important, and commonly has to do with the fact that everything in the room must be removed and stored out of the way. Merely preparing for a weekend project is a weekend project in its own right.
Training
Empty the Space — Bottom line: The room you're about to work on must exist empty—floor to ceiling—if you're installing unfinished wood floors. The flooring must exist empty no matter what cloth you lot're installing. Of course, the floor space must exist void of stuff for obvious reasons. All the same, shelves, pictures, knick-knacks, etc., should go also, considering of the dust from cutting and sanding the new flooring.
You as well need to programme access to the room and to the other areas of your house. Once the flooring is down, accept a plan in place and so that you and your family have a place to be while the various cease layers dry. Many people avoid this, me included on several projects, by purchasing engineered or pre-finished floors. The last affair you have to empty out is the grit and dirt from the sub-flooring. Suck it up with a store vacuum.
Underlayment — Installing woods floors straight to the sub-floor without a barrier in between is an invitation for squeaks. A keen bond suspension is red rosin paper, which comes in rolls 100 feet long and 3 feet wide. Roll it out over the entire sub-floor. Overlap layers about 4 inches and secure with blue painter's tape.
Y'all can besides use asphalt impregnated (tar) paper. Asphalt newspaper is suitable where moisture beneath the floor might be an issue, for example if you're installing wood floors on the first flooring of a firm above its humid or wet basement or directly over a concrete slab. Use a hammer tacker or staple gun to secure the material to the sub-floor.
Dorsum Priming — In locations where the floor might be exposed to wet from its finished side, similar a kitchen or bath, treat the backs of each board by brushing or rolling on 1 coat of urethane. This seals the material and enables it to dry uniformly which helps keep joints from opening upwards. Exist careful to hunt drips so they don't interfere with installation later when they dry out and harden.
Trim Prep — If your flooring project volition be installed after you re-trim the infinite, make sure to agree upwardly your baseboard and door jamb legs the thickness of your flooring, unremarkably iii/four inch. The best gauge you tin can employ is a cake from the floor you're well-nigh to install. If you're installing the flooring in an existing space and don't programme to remove the base of operations trim, be aware the base will await smaller and probably giddy with the new flooring butting into information technology. Consider replacing information technology earlier installing the new floor. And, no thing what conclusion you make for base trim, you'll accept to install shoe molding to transition betwixt the flooring surface and the vertical confront of the base trim.
Tools
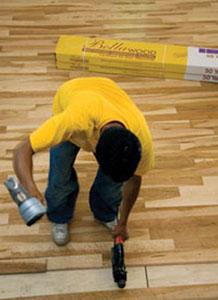
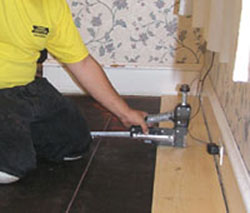
Nailing — In the old days, carpenters used small hard-cut nails to hand-nail their floors. They'd drive the nails through the tongue of each board into the joist beneath. Today, we use flooring nailers that drive either cleats or staples. These nailers can either be transmission or pneumatic (manuals drive cleats but; pneumatics drive staples or cleats), and both can be rented for the day or weekend at a very reasonable cost. Check with your floor supplier which fastener is best for your floor.
It'southward also helpful to have a finish nailer. Since y'all can't get the larger flooring nailer much closer than 6-inches to the wall—and swing the mallet to drive the fastener—you'll accept to face-nail the first and last couple of courses of wood, depending on what width material y'all apply. Popping finish nails into the face of the starting and stop-wall boards makes quick piece of work of nailing. Stop nailers are also ideal for fastening the shoe molding. If you hand-smash the face up boards, pre-drill them kickoff for hardwoods and at the ends of softwood planks.
Cut — Clean, accurate and quick cuts are vital for installing floors fast and right, and a expert miter saw is the right tool for the job. For many floor jobs, I bring a 10-inch chop box right into the room and make my cuts there both for the floor and the shoe molding that covers the edges.
Chances are you'll have to rip the last piece to fit, and a table saw is ideal. Although, you lot can utilise a circular saw as well, since the rough edge of the last slice will be covered with shoe molding.
Side Note 1
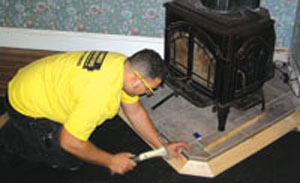
On the Threshold
On nearly flooring installs, transitioning between rooms and flooring types can be a real brainteaser. The key is creating expert thresholds. For many engineered flooring types the manufacturer makes threshold material, simply I've institute making my own is the only dependable style to make the jump. Each floor is different, but before you go out the home center, make sure you lot have a couple of pieces of ane-by-6 of the same wood species as your floor. Once your floor is downward, you tin lay out and create a custom-made threshold to jump or sink to that existing tile or laminate flooring surface. A trivial skill with a table saw will aid you tune-in the piece. I also bevel leading edges whenever possible because feet like smoothen transitions. Whenever beveling, brand sure to get out plenty on the leading edge—at least 1/four inch—so the fabric lays flat. This takes time, and you'll notice yourself saying "the devil is in the details," merely information technology is worth the effort. Remember, you'll be walking on this flooring for a long fourth dimension, so you want it to be primo.
Layout
Layout is where it's at. It ever is, whether you lot're talking nearly your life or a carpentry projection. Here are some tips for flooring layout that'll get you a flooring you can be proud of.
Stride one. Floor planks should be installed perpendicular to the joists, so determine the joist management before beginning installation.
Step ii. Measure the distance from the baseboard (or drywall) of the far wall from which yous plan to start laying the boards—on each stop of the room. If the distances are the same, the room is square and yous can butt your first board against the drywall and go to town. If this is the instance, put some 1/four-inch stock against the drywall to create a gap betwixt the drywall and the floor. Information technology gives the floor organization room to expand.
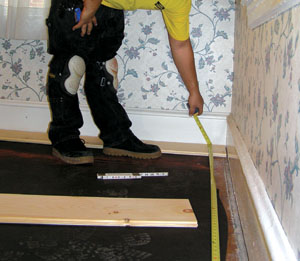
If the measurements in each corner are not the same, you lot must create a straight line from which to start, a control bespeak. I do this by measuring from the far wall to where the front—or tongue—should be, relative to the starter wall. Utilize a long, direct slice of flooring fabric equally a gauge to prove where the front should lay. Adjust its position along the starter wall until the measurements are the same in each corner of the room. Remember, because you might exist able to tuck the starter board under base molding or shoe molding, this is the identify to make adjustments. Just don't create a gap larger than the trim can embrace by at least 1/4 inch. The fundamental is to create a line parallel (within a i/8 to i/iv inch is fine) to the end wall. Once you lot have it, snap lines.
Why go to all this effort for the offset board? So that when y'all become to the last lath, you won't have to finagle some silly looking pie-shaped board in to fit against the finish wall. This is measuring time well spent. Fourth dimension spent measuring—and thinking—is nigh always fourth dimension well spent.
Pace 3. Face-smash the first boards in identify on the chalk line, then take at it for the remainder of the field. Brand sure, equally yous get, that no joints line up betwixt courses. I like to keep them at to the lowest degree six inches autonomously.
Side Note 2
Lumber Liquidators Floor Prep and Installation Tips
Lumber Liquidators, i of the nation's largest floor suppliers, offers some proven tips. Abraham Diaz, Lumber Liquidators' regional manager for the State of Florida, chimes in on what works and why:
Grooming
Dealing with Moisture From Beneath: If you're installing a wood floor directly over a concrete slab or boiling basement infinite, managing that moisture is vital. For slabs, Diaz recommends using a moisture meter to get a moisture reading, which might hateful calling in a pro to coat the slab properly if the moisture reading is very high. However, in many applications, you can install xv-pound asphalt paper and 6-mil plastic over the entire flooring, then encompass that with 3/four-inch plywood subfloor. This means you lot cannot employ mucilage (see below.)
Dealing with Moisture From Above: "You tin't open up a mag these days and not encounter a wood flooring in a kitchen or bath," says Liquidators' Diaz, but y'all have to wait those floors to perform differently than if installed in a living room. This is because water will probable get under the boards over fourth dimension and possibly crusade cupping. The best defense force is to manage your own expectations of flooring performance, apply mats in the really moisture areas and clean up spills quickly.
Installation
Nailing: Diaz recommends using a pneumatic flooring nailer for installation. The pneumatic tool provides consistent power to countersink fasteners, enough momentum to describe boards together, and the speed to get the job done quicker than with transmission flooring nailers. Transmission flooring nailers will piece of work, merely are tougher and slower to employ.
Fastener Type: You can nail down a floor using either cleat nails or staples. Diaz thinks staples have better belongings power.
Top Nailing: Top nailing is an selection with wide plank hardwood or pino floors. Top nailing with hard-cut fe nails—in addition to using the flooring stapler—can give yous that formal farmhouse kind of look. Or, you can use screws and plugs as an alternative. Diaz also suggests gluing and top-nailing on wide plank floors as a belt-and-suspenders approach to making the floor concluding. The peace of mind it'll provide is worth the little extra time and money it'll toll.
Finishing
While you can utilize polyurethane (oil-based) or h2o-based finishes for raw wood, in that location's no doubt in Diaz's mind which he goes to. For water-based finishes, he says, dry times are cut from 24-72 hours to 1-2 hours. They don't crusade the floor to amber, leaving it looking as natural as possible.
He suggests a semi-gloss or satin terminate rather than a loftier gloss, considering the higher the gloss, the quicker traffic marks start to show up (or scratches, if you lot have a dog). He suggests Traffic past Bona-Kemi equally a good finish product, and says raw forest must be sealed showtime, and and then finished with three coats of finish.
Sanding & Finishing
Y'all have to sand unfinished floors to shine everything out. Proverb this is a dusty chore is like calling a tornado a gentle zephyr. You tin can hire sanding equipment and do the work yourself, merely this is a project that is worth paying someone else to exercise, if that's in your budget. First, their sanders are more powerful. Pros hardwire their machines to a 220 line in your breaker box. The machines you rent by and large run on 110 from a standard wall socket, and information technology shows when it comes to removing heavy stock quickly. And, the last thing I'm afraid of is hard piece of work, simply sanding floors is os-crushing labor, particularly for really chopped-up spaces and stairs. The pros know the tricks to brand it go smoothly and they'll be able to finish it lickety-split up.
Whichever way y'all go, however, (and the way I go is to a reliable source like Lumber Liquidators, where I source the floor and the pros to finish information technology), you should manage the grit. Job 1: Seal openings and doorways with plastic driblet cloths and tape. Chore 2: If you practise a lot of home renovation, this is an eminently handy tool—get an air cleaner. They're terrific dust eaters. If you don't practice this, at least stick a box fan in an open window with a furnace filter over information technology and create a electric current of air that'll suck some of the dust outside.
The last footstep is to be proud of the work you've washed. There is nothing similar a new floor, because in one case information technology's in, that commonly means you're done building and ready for enjoying. As my daughter loves to tell me: That's the bespeak.
Side Note three
To Finish or Not To End…
. . . that is the question. The answer lies in both aesthetics and practicality. Unfinished cloth is cheaper to purchase but costs money, time and effort to sand and apply urethane. However, once that effort is exerted, the floor is one apartment, even and durable plane.
But, pre-finished floors, whether engineered material or solid hardwood, have some serious benefits that are worth considering. First, the installed cost of solid, pre-finished hardwood rivals the installed price of bare hardwood. What you gain is this: no time, effort or expense spent finishing and a flooring surface that you can refinish later, plus a impenetrable, factory-applied terminate that'll stand up upward to well-nigh anything. The merchandise-off is a bevel between each floor lath. To me, it's a prissy item that gives the floor texture, but others may accept a different opinion.
For engineered stock (OSB, plywood, or another fabric with a solid wood veneer) y'all go a flush surface, just unremarkably cannot re-sand the flooring. The finishes are nigh impenetrable, but the floor thicknesses are sparse and often require innovative thinking at transition points to other rooms.
Editor's Annotation: Marker Clement is the author of The Carpenter'south Notebook and Kid'south Carpenter's Workbook, Fun Family Projects! Notice out more at world wide web.TheCarpentersNotebook.com.
williamsontobt1980.blogspot.com
Source: https://extremehowto.com/pro-tips-for-tongue-groove-flooring/
0 Response to "Can You Nail Hardwood on the Groove Side"
Post a Comment